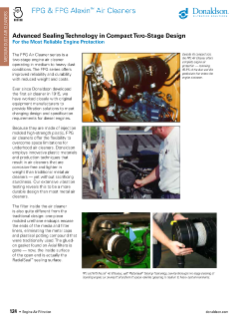
Overview

Air Cleaner Features
- Easy to service, no tools needed — usually done in 5 minutes or less
- Durable plastic housing — corrosion-free, vibration-resistant and lightweight
- Two-stage air filtration. Built-in, tangential pre-cleaner ahead of primary filter removes up to 85% of incoming dust
- 90° or straight outlet available to fit specific application
- Easy-to-fasten latches retain dust cup/cover. Four (larger) models have twist-off cover
- Tapped to accept filter service indicator
- A plastic inlet hood and stack (up to 457 mm / 18 in. tall) may be added
- 45° Vacuator™ Valve orientation permits either vertical or horizontal air cleaner mounting (the dust cup can be incrementally rotated to suit specific application)
- FPG Alexin™ models offer a single easy-access latch and a twist-off cover design
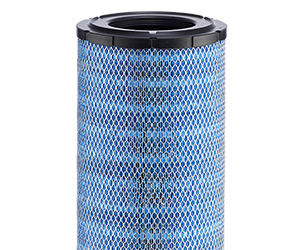
Filter Features
- Filters have RadialSeal™ Sealing Technology that creates a reliable, critical seal and makes servicing easy
- One piece, molded urethane endcaps encase the filter media and liners
- Safety filter protects engine during in-field filter change outs. All FPG models can accept safety filters.
- Specification table shows which air cleaner models ship with a safety filter installed
Benefits
- Servicing is quick and easy
- Durable, but lightweight construction provides application and installation flexibility
- Sure sealing system
- Built-in pre-cleaner eliminates need for external pre-cleaner in most applications
Applications
- Equipment operating in medium-dust conditions with engine airflow range of up to 9.8 m³/min / 346 cfm airflow per air cleaner — double throughput by using two units
- Installation can be horizontal, vertical, or even at an angle (as long as Vacuator™ Valve points down)
- Temperature tolerance: 83° C / 180° F sustained
- Do not install next to turbocharger, muffler, exhaust pipes, or other high-temp component
- Compressors and generator sets
- Construction and in-plant vehicles
- On- and off-highway vehicles
- Marine and offshore equipment
Resources


Service
This servicing information is provided as a best practices guide. It is not intended to replace or supersede the service instructions supplied by your engine or vehicle manufacturer.

1. Check the restriction
Replace the filter only when the restriction level has reached the maximum recommended by the engine or equipment manufacturer or on a regular service schedule.

2. Clean out the Vacuator™ Valve
If your air cleaner is equipped with a Vacuator™ Valve, visually check and physically squeeze it. Make sure the valve is flexible and not inverted, damaged or plugged.

3. Remove the primary filter
Shut off the engine. Unfasten or unlatch the service cover. For the FPG Alexin™ models, the cover is unlocked with a yellow "finger", twisted to the left and removed from the filter housing.
The RadialSeal™ filter fits tightly over the outlet tube and there will be some initial resistance, similar to breaking the seal on a jar. Gently move the end of the filter back and forth to break the seal, then rotate while pulling straight out. Avoid knocking the filter against the housing.

4. Visually check the safety filter and clean both surfaces of the outlet tube
If your air cleaner has a safety filter, visually check it while in place for signs of damage. Do not remove the safety filter unless it is damaged or due for replacement. Also verify that the safety filter is properly seated in the housing.
The safety filter should be replaced every three primary filter changes. Use a clean damp cloth to wipe both the filter sealing surface and the inside of the outlet tube. Ensure that the outlet tube sealing area is undamaged.
Contaminant on the sealing surface could hinder an effective seal and cause leakage. If the safety filter is to be replaced, avoid leaving the outlet tube exposed to the air. If there is to be a delay in installing the new safety filter, cover the air cleaner outlet tube to avoid admitting any dust.

5. Inspect the old filter
Inspect the old filter for any signs of leaks. A streak of dust on the clean side of the filter is a telltale sign. Eliminate any source of air leaks before installing the new primary filter.

6. Inspect the new filter
Inspect the new filter for any damage that may have occurred through mishandling. Never install a damaged filter. Visually check the inside of the open end, which is the sealing area. Do not wipe the filter RadialSeal™ sealing area. Donaldson RadialSeal filters have an invisible dry lubricant on the seal to aid installation.

7. Insert the new filter
First, if you’re servicing the safety filter at this change-out, seat it properly into position before installing the primary filter. Insert new filters carefully. Seat the primary filter by hand, making certain it is inserted completely into the air cleaner housing. To complete a tight seal, apply pressure by hand at the outer rim of the filter, not the flexible center.
No cover pressure is required to hold the seal in place and you should never use the service cover to apply pressure. This could damage the housing and fasteners and void the warranty. If the service cover presses against the filter before the cover is fully in place, remove the cover. With the cover off, push the filter farther into the air cleaner by hand and then the cover will go on with no extra force. Once the filter is in place, secure the service cover.
Note: For FPG Alexin™ models, twist the cover to the right until it stops, then push the yellow "finger" in to lock.

8. Check connectors for tight fit
Make sure service indicators are reset and in proper working order. Check that all mounting bands, clamps, bolts, and connections in the entire air cleaner system are tight. Check for holes in piping and repair or replace as needed. Any leaks in the intake piping will admit dust directly to the engine. Reset the filter service indicator